Before placing your order, please review the following essential guidelines.
This will help you avoid mistakes, delays, and any confusion during the purchase process.
Please have the following information ready:
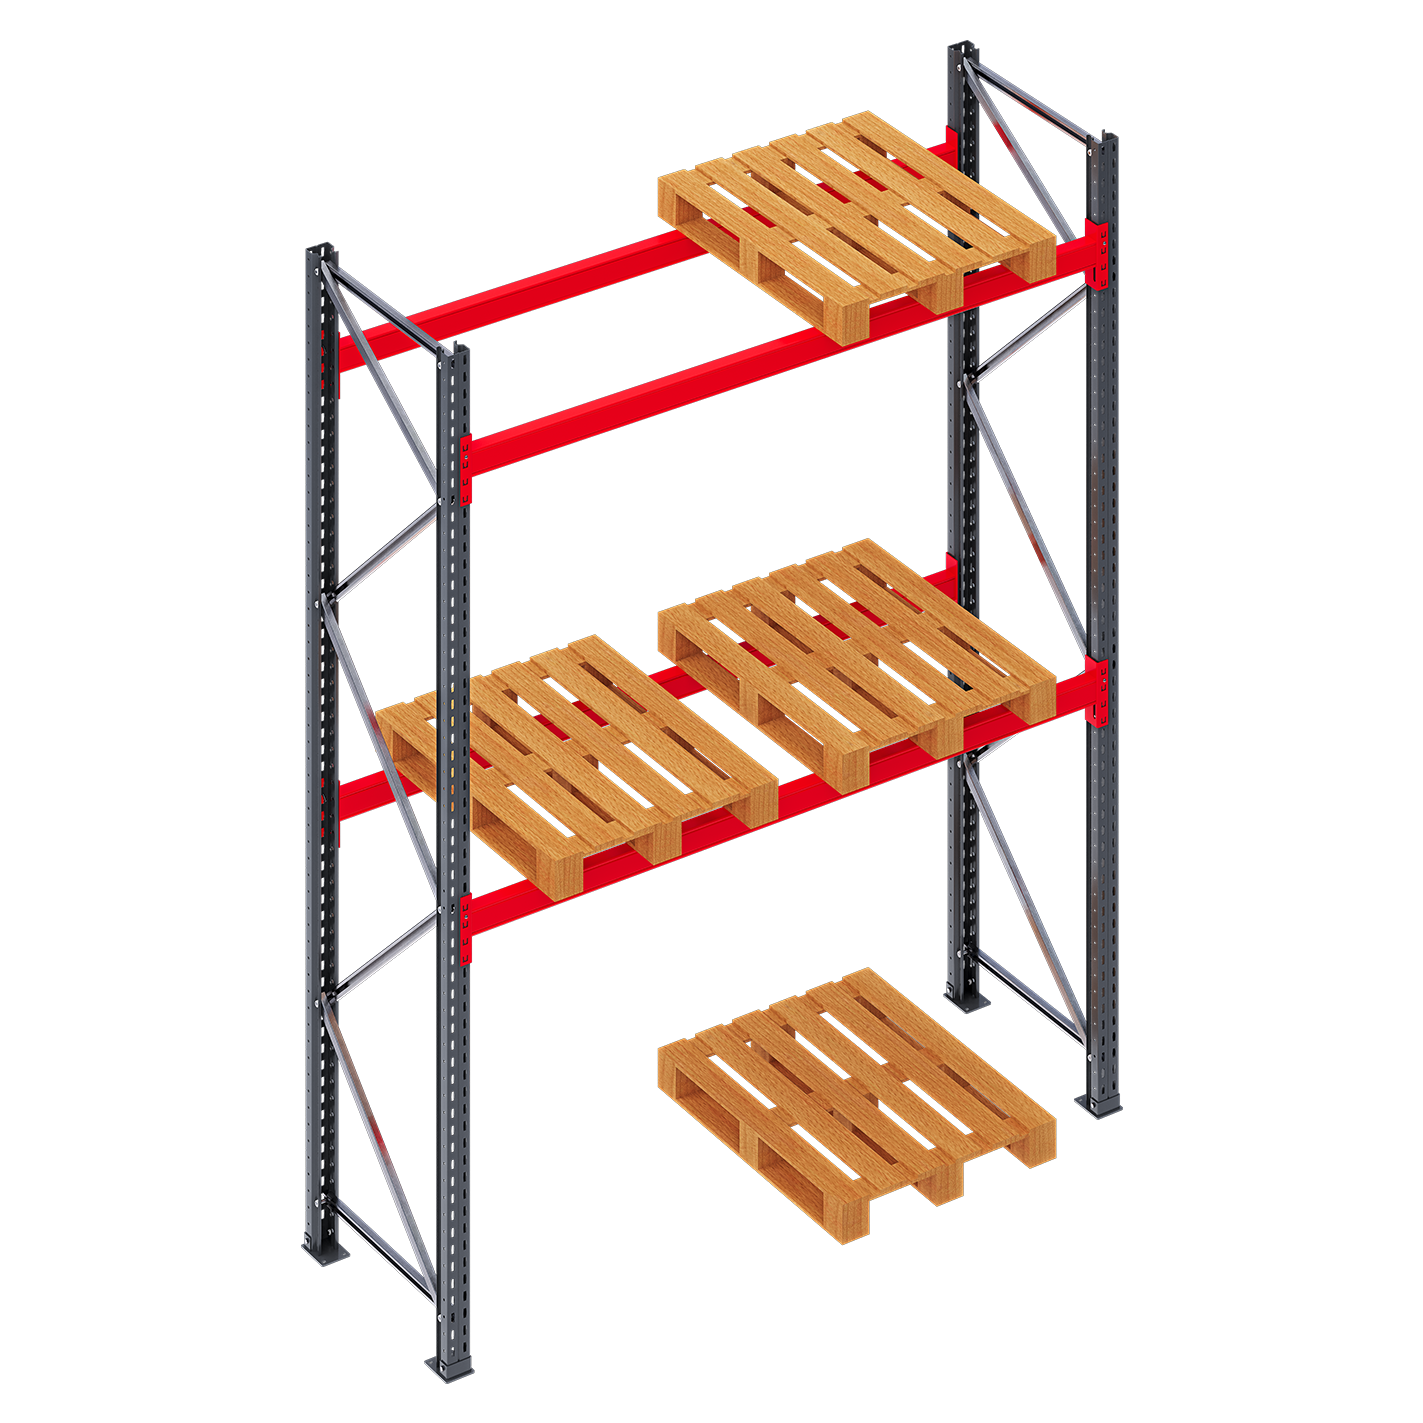
A complete UniRack bay is made up of at least two upright frames and a set of load beams that support shelving panels. Additional bays can be attached using two beams, which are suspended between the upright frames. The upright frames are reinforced with diagonal and horizontal braces for strength and stability. Shelves can be made from steel panels, wooden boards, or mesh decking, depending on the type of goods stored, and the length of the beams defines the bay length.
Because of their medium-to-high load capacity, these racks must always be anchored to the warehouse floor using special floor anchors. Anchoring prevents racks from tipping over and ensures that their original alignment is maintained. In large installations, racks are exposed to continuous forces from frequent loading and unloading operations, which can cause gradual movement over time. By securing the racks with floor anchors, this movement is eliminated, and the system remains firmly in place.
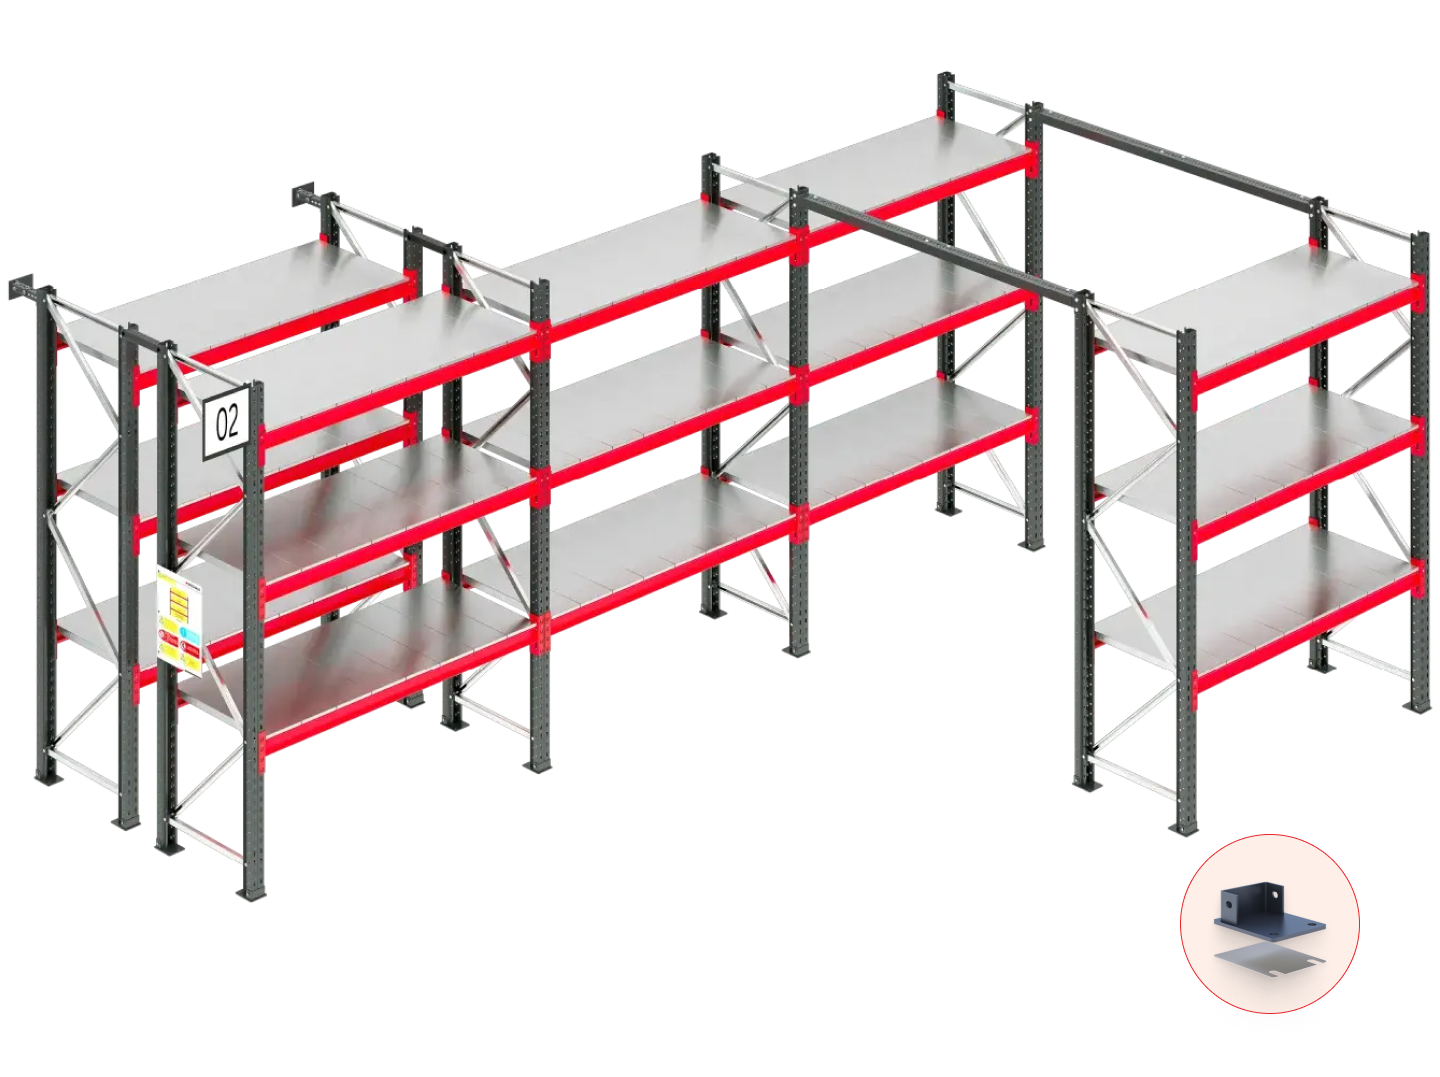
Frame — Vertical structure that supports beams and holds the racking system. It is
made with vertical components called uprights.
Horizontal & Diagonal Bracing — Provides lateral stability to prevent racking from
swaying, and connects the 2 uprights together.
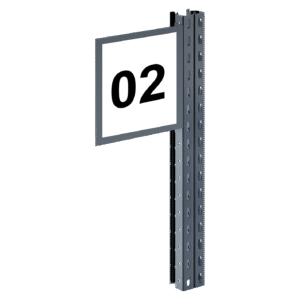
Aisle Identification Board — Labels aisles for easy identification and organisation.
Rack Load Notice — Displays the load capacity of the racking system to ensure safe
usage.
Row Spacer — Maintains distance between racks, ensuring stability.
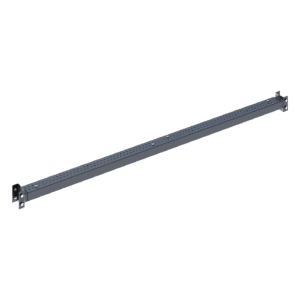
Top Tie Beam — Connects frames at the top, adding stability and preventing flexing.
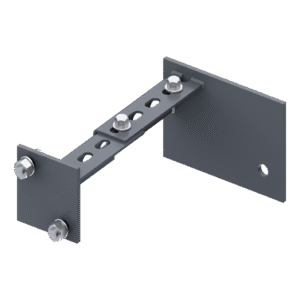
Wall Connector — It is a metal component used to anchor or connect the racking
structure to a nearby wall for extra stability and safety
Levelling Shims — Corrects any unevenness in the floor, ensuring the rack is level. The
upright leg is placed on the shim.
Upright Leg — or a Footplate. This is where the upright rests upon. The leg is
anchored into the floor to ensure sturdiness.
Panel — Panels are placed on the beams that provide a continuous surface for
irregular shaped items, loose items, or different /odd shaped pallets.
Frame — Vertical structure that supports beams and holds the racking system. It is made with vertical components called uprights.
Rack Load Notice — Displays the load capacity of the racking system to ensure safe usage.
Top Tie Beam — Connects frames at the top, adding stability and preventing flexing.
Wall Connector — It is a metal component used to anchor or connect the racking structure to a nearby wall for extra stability and safety.
Levelling Shims — Corrects any unevenness in the floor, ensuring the rack is level. The upright leg is placed on the shim.
Upright Leg — or a Footplate. This is where the upright rests upon. The leg is anchored into the floor to ensure sturdiness.
Panel — Panels are placed on the beams that provide a continuous surface for irregularly shaped items, loose items, or different /odd-shaped pallets.
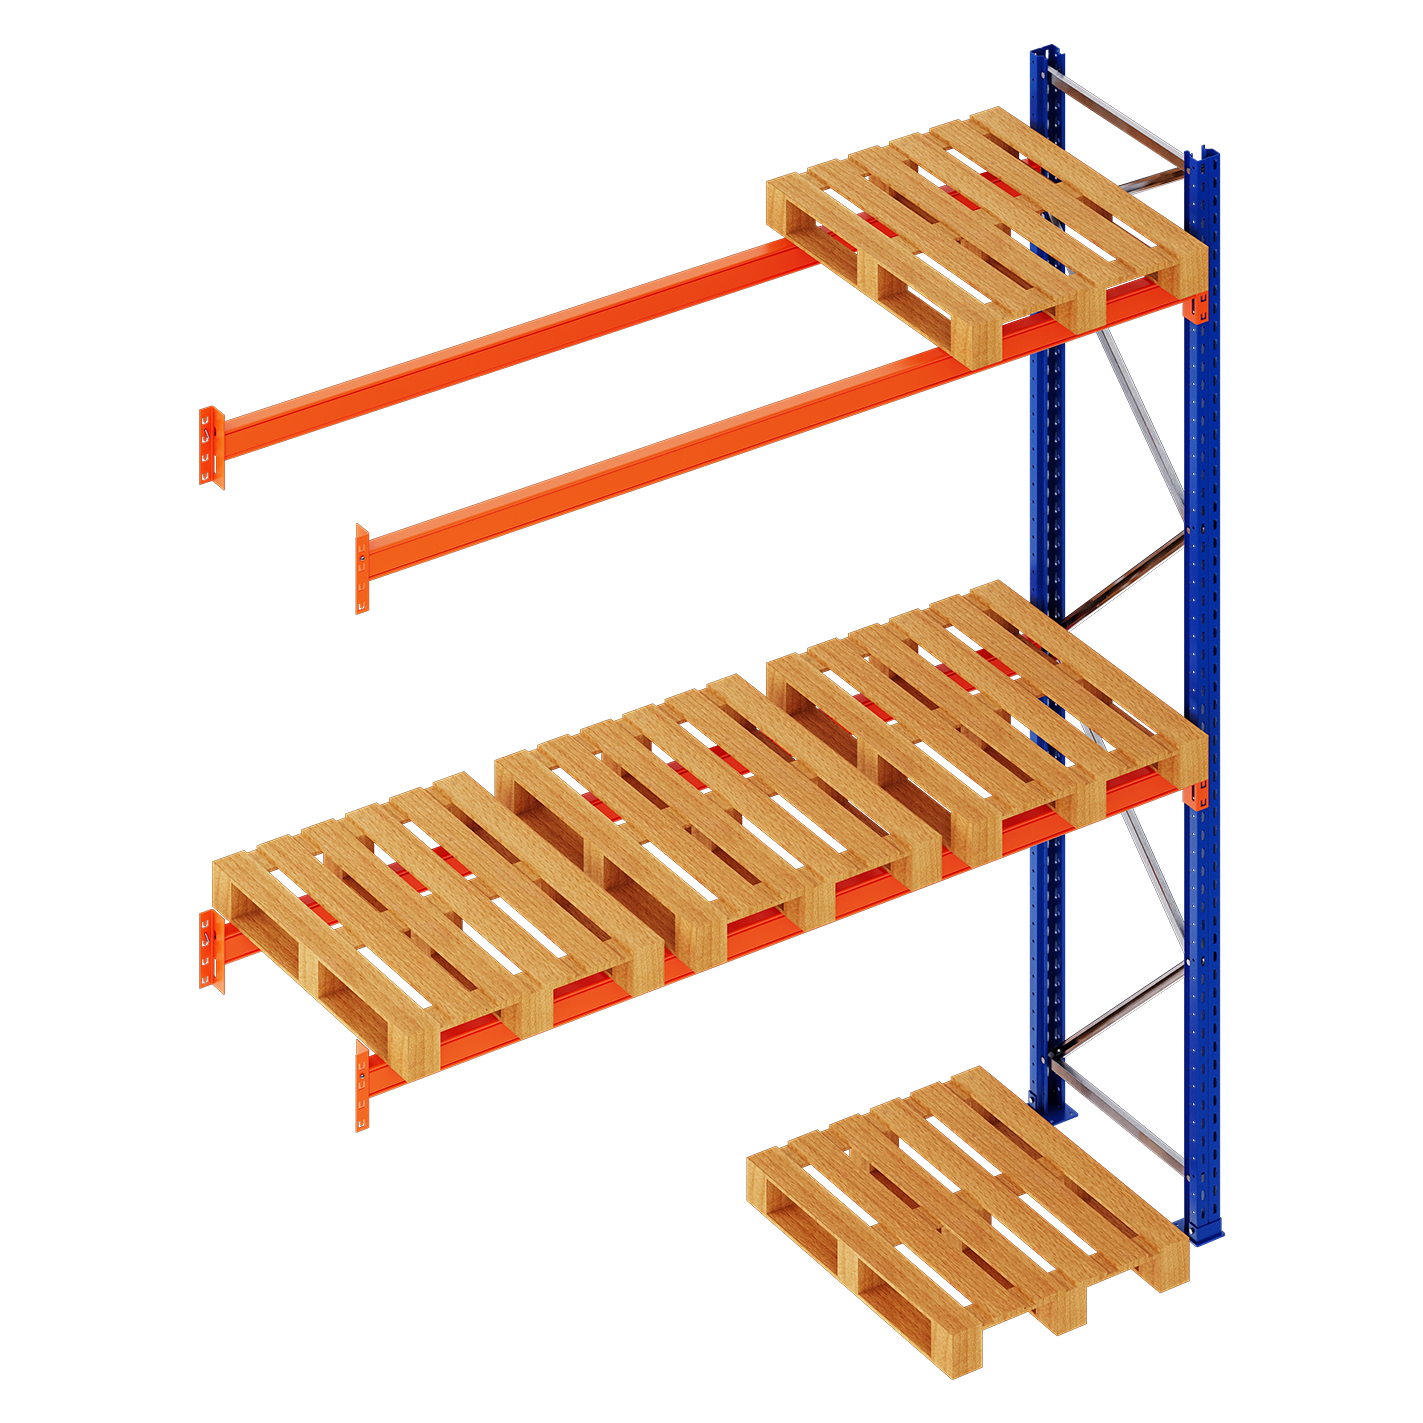
Often referred to as the Starter Bay, this unit is a complete rack section made up of two upright frames connected by a full set of beams. It can function independently as a single unit or serve as the starting point for a continuous row of racks. From the Main Bay, the system can be extended as needed, with the help of various compatible accessories and components.
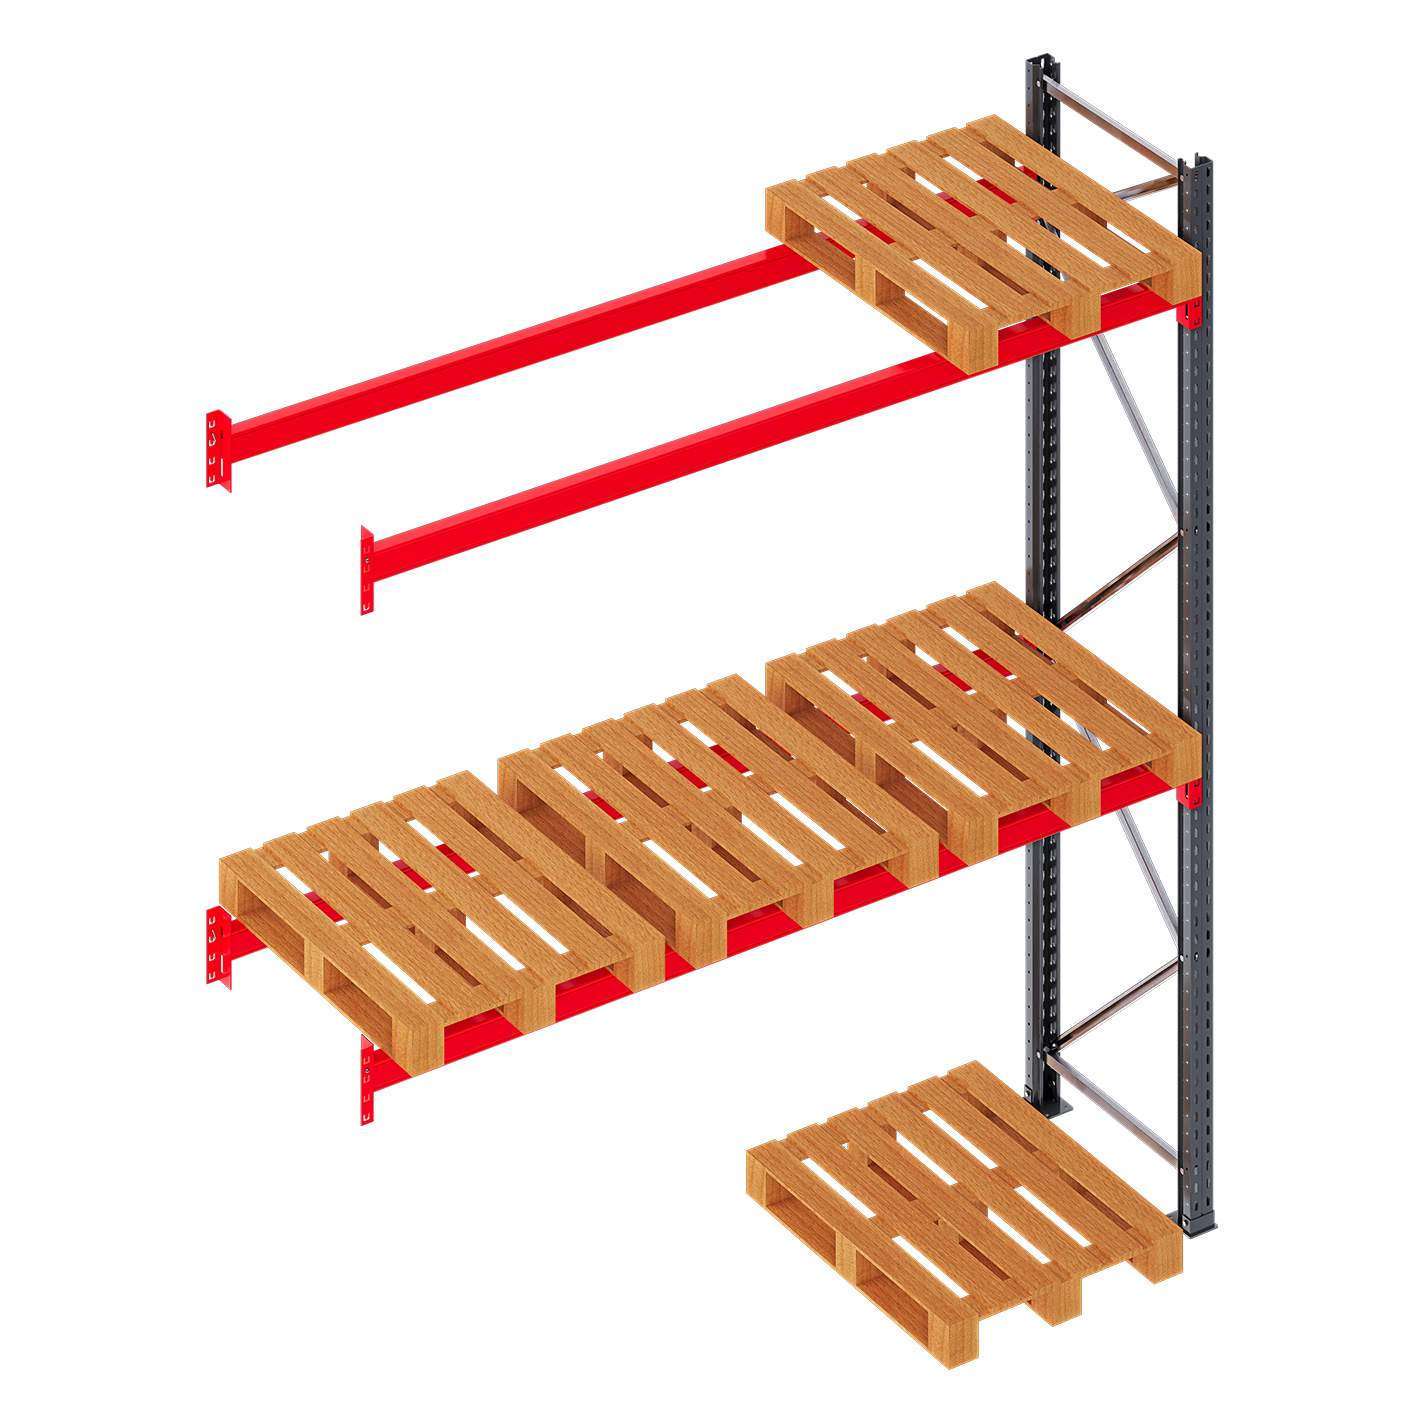
Commonly known as the Extension Bay, this unit consists of one upright frame and a set of beams. Unlike the Main Bay, it cannot stand alone or be used as the first unit in a run. Instead, it is designed to connect directly to a Main Bay, forming a seamless extension. While the depth of the Add-on Bay must match that of the Main Bay, its height and length may be adjusted to suit specific requirements.
Because main bays are the only units that can stand alone, you will need one for every run. To determine the total number of main bays that can be accommodated, first review the layout to confirm the overall storage depth available, accounting for the required clearances on all sides. Next, finalise the rack depth to be used.
If there are pillars or columns in the facility, the rack run should stop before the pillar with the required clearances. After the pillar, the run can continue by starting again with a Main Bay, keeping the same spacing in mind. In addition to the clearances needed, also
consider the placement of top-tie beams if you plan to use them.
An example, if the available storage depth is 18,000 mm (18 m) and the selected rack depth is 800 mm, we must also consider the clearance required for the Material Handling, so an aisle width of 1,000 mm is required between two rack runs.
Each rack run requires 800 mm (rack depth) + 1000 mm (aisle clearance), except at the outermost racks, which only require the rack depth without additional clearance behind them.
For 10 rack runs (main bays):
Adding a 11th rack run (main bay) would require an additional 1,000 mm (aisle) +
800 mm (rack depth) = 1,800 mm, increasing the total depth to 18,800 mm, which exceeds the available storage depth.
Therefore, the maximum number of rack runs feasible in this layout is 10 main bays.

When planning for add-on bays in a continuous run, the calculation differs slightly from main bays and requires careful evaluation of the available layout. Begin by confirming the total length of the area available for racking (accounting for the required clearances), and then finalise the rack length.
For example, if the available floor length is 25,000 mm (25 m) and the chosen rack length is 2,300 mm, the first unit will be a Main Bay, which occupies one rack length. This leaves a residual space of: 25,000 mm – 2,300 mm = 22,700 mm Within this remaining space, only add-on bays can be placed.
With 9 add-on bays:
Total length = 9 × 2,300 mm = 20,700 mm, which fits within the available 22,700 mm.
With 10 add-on bays:
Total length = 10 × 2,300 mm = 23,000 mm, which exceeds the available space.
Therefore, the maximum configurations for this layout is 1 main bay + 9 add-on bays, making a total of 10 bays in the run.
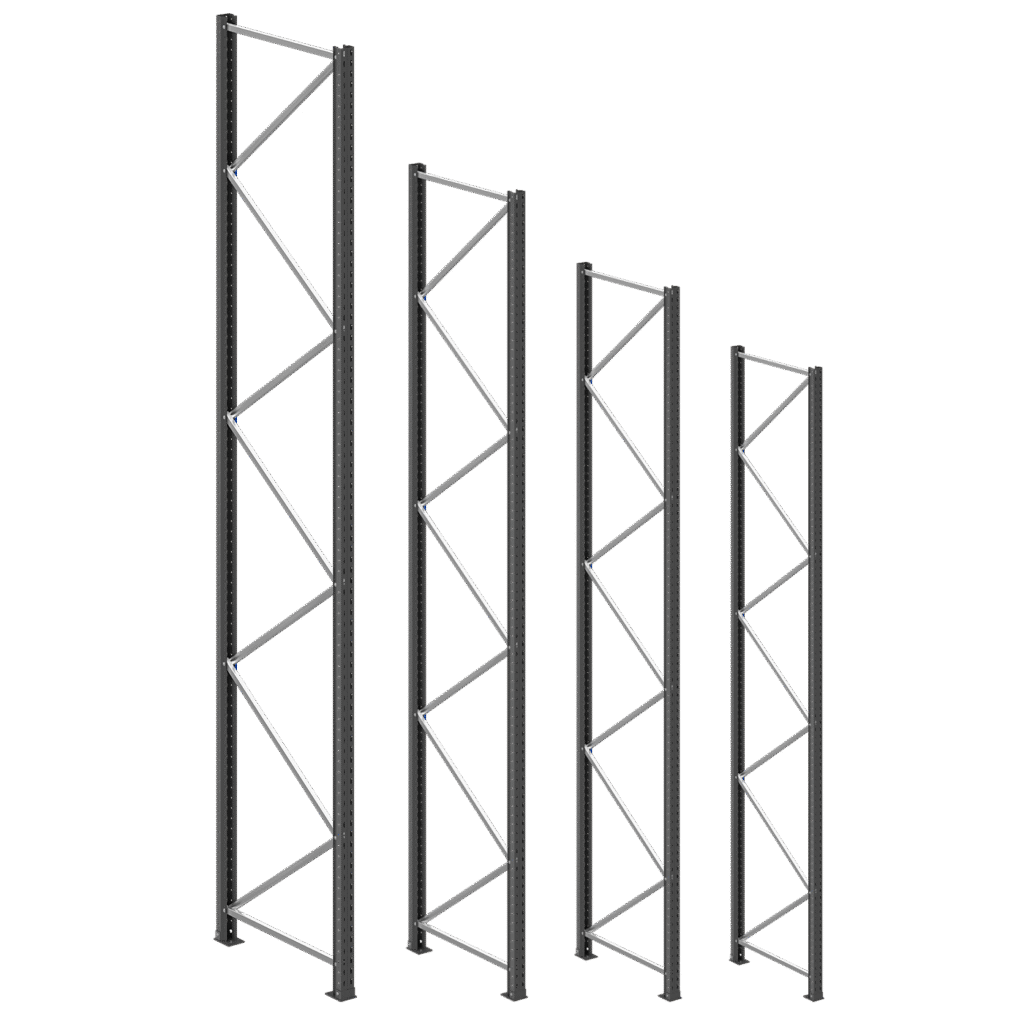
The Frame Depths of the UniRack has 6 variants — Depths of 450 mm, 600 mm, 750 mm, 900 mm,1000 mm, and 1200 mm.
The system is available in configurations that adapt perfectly to both compact and spacious areas.
| Number of Levels Possible Height Wise Table | ||||||||
|---|---|---|---|---|---|---|---|---|
| Frame Height | 2 Levels | 3 Levels | 4 Levels | 5 Levels | 6 Levels | 7 Levels | 8 Levels | |
| 2000mm | Yes | Yes | Yes | – | – | – | – | |
| 2500mm | Yes | Yes | Yes | Yes | – | – | – | |
| 3,000mm | – | Yes | Yes | Yes | Yes | – | – | |
| 3,500mm | – | Yes | Yes | Yes | Yes | Yes | – | |
| 4,000mm | – | Yes | Yes | Yes | Yes | Yes | Yes | |
The Frames of the UniRack has 5 heights — 2 m, 2.5 m, 3 m, 3.5 m, 4 m. The number of levels you can have depends on 2 factors: load per level, & the height of the frame.
Check the table to see how many levels will fit your needs:
The number of levels in a rack can be maximised as long as the Total Rack Load remains
within the bay’s capacity.
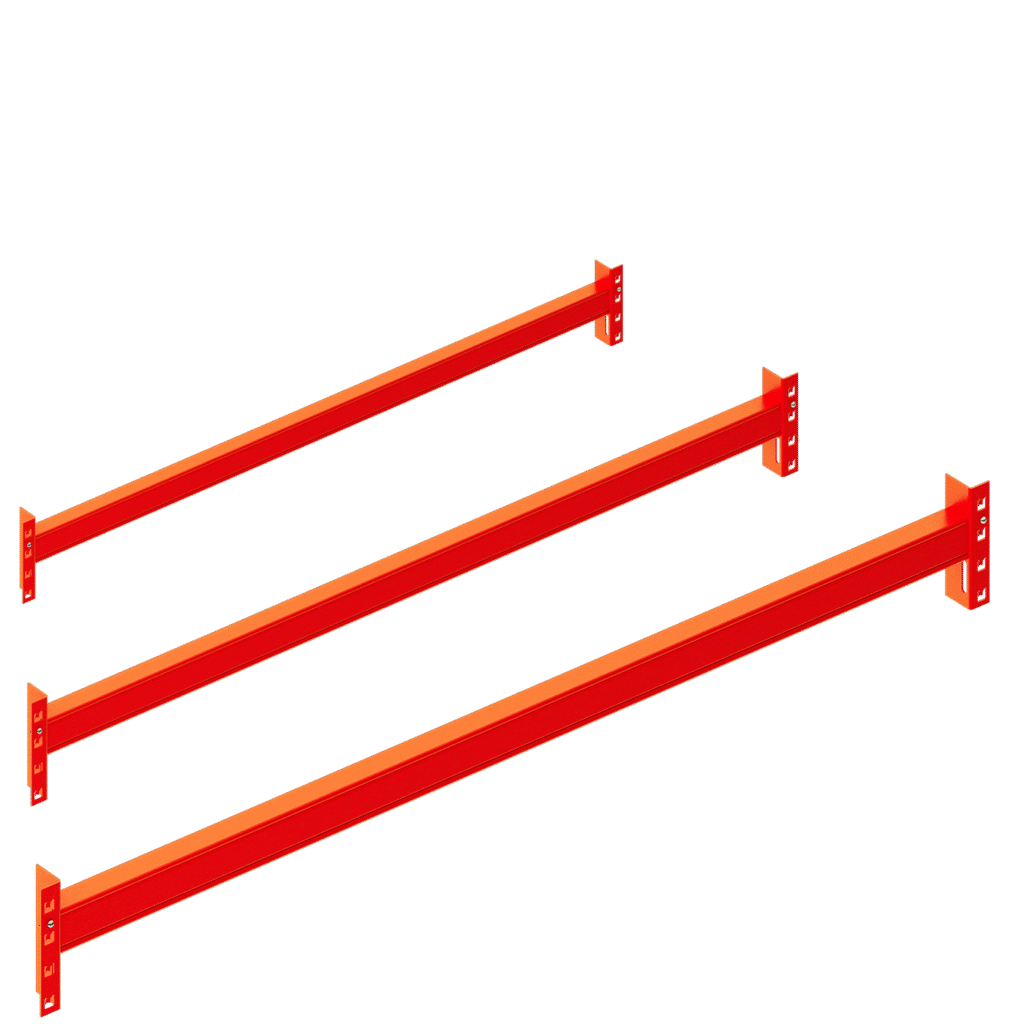
The UniRack is designed to have 6 different Rack Lengths — 1800 mm, 2000 mm, 2300 mm, 2500 mm, 2700 mm & 3000 mm.
The maximum level-to-level height is 1500mm. Increasing this any further will decrease the load carrying capacity, substantially. At the same time, decreasing level-to-level height will briefly increase the load carrying capacity – although this is strongly not recommended by us. If you still wish to add more levels, you can always purchase extra beams by clicking here.
Always ensure that the highest level is positioned at least 500mm below the top edge of the upright frame. This safety clearance prevents stored goods from slipping sideways over the top of the rack. It is mandatory for all racks that are facing aisles or exposed to traffic routes — where movement and people are present. It is not required for racks positioned back-to-back within a continuous row since no people are present and goods cannot fall sideways to the next frame.
Failure to observe this rule may result in falling goods and increased risk of accidents.
Regardless of the rack length or load-per-level combination selected, it is essential to ensure proper load distribution along the beam. For different loads per level, we have different profiles of beams available. These profiles change as per thickness and dimensions.
Compatible material handling methods include manual picking, hand trolleys, and light material handling equipment, making it ideal for operations that require frequent access and easy stock rotation. Perfect for storing products with multiple SKUs, medium-weight inventory, or goods requiring direct accessibility—UniRack ensures every item can be retrieved without disturbing others.
Your order will take 5-6 days to process plus the additional time taken for delivery shown at your checkout when it is finalised.
You will need a team of 4-8 people. Assembling 1 Main Bay usually takes 1hour depending on the skillset and tools used.
Because starters are the only units that can stand alone, you will need one for every run and one for every standalone unit in your warehouse layout. This makes calculating thenumber of starters you need simple. Determine how many runs and standalone units you need — that’s the number of starters you should purchase.
Add-ons are for continuous runs, and these calculations require more thought. Consult your layout to determine how many continuous runs you need to outfit. Then, record the number of bays each run will have. If your warehouse has 10 runs with 14 bays per run, you’ll need 13 add-ons for each run. Multiplying 13 add-on bays for each run by 10 runs is a total of 130 add-on bays.
While ordering a basic Main Bay, you will get all the required main components in your order — 4 uprights, its necessary quantity of horizontal and diagonal bracings, 4 upright legs, 4 levelling shims, 2 load beams for each level, the required quantity of panels for each level selected, & 4 lock pins for each level. All the necessary hardwares and fasteners are also provided in the required quantities to anchor and secure the mentioned components.
While ordering a basic Add-on Bay, you will receive — 2 uprights, its necessary quantities of horizontal and diagonal bracings, 2 upright legs, 2 levelling shims, 2 load beams for each level, the required quantity of panels for each level selected, & 4 lock pins for each level. All the necessary hardwares and fasteners are also provided in the required quantities to anchor and secure the mentioned components.
Along with these main components, any other accessory or extra component added in your order will also be sent with its required fasteners.
No tools will be provided and no extra fasteners are provided in our kits.
Of course, all the assembly instructions and user manuals are also provided. A digital copy of the same will be available for you in your account as a backup too.
Absolutely. We know that choosing the right rack system can feel overwhelming.You can explore our support and design services here to get step-by-step assistance.
Our support team is available Monday to Friday, 9:00 AM to 5:00 PM (IST). You can reach us at support@jaystorix.online, and we’ll get back to you promptly.
Once a product has been shipped, cancellations and returns are not accepted. For full details, please review our policies here.
At Storix, we prioritise earning our customers’ trust through superior design, quality, and safety in every aspect of our UR systems. Our solutions incorporate carefully designed components, such as pallets and cage bins, that ensure efficient storage and ease of use. We follow the highest design standards to maximise space utilisation while prioritising operator safety, creating systems that are both reliable & user-friendly, and also safe for
the environment.
Installation is seamless and hassle-free, allowing customers to experience immediate benefits without unnecessary delays. Our premium-quality powder coating enhances durability, ensuring a longer product life while maintaining exceptional performance under rigorous conditions. Additionally, we are committed to environmental responsibility, using well-processed, eco-friendly materials that align with sustainable practices. With Storix, customers can trust in a system that delivers unmatched reliability, safety, and longevity.
For a superior, conventional design offering seamless accessibility, robust durability, and
efficient storage for a wide variety of goods, Storix UniRack is the perfect long span
shelving solution for your warehouse.
UniRack is the right fit for you if your products…
1. Require Frequent/ Continuous Loading and Unloading.
Examples: clothing, electronics, toys, spare parts, groceries, etc.
2. Need easy Access to Individual Boxes/ Bins/ Cartons across multiple SKUs.
Examples: packaged food, beverages, medicines, cosmetics.
3. Have a High Turnover and Require FIFO (First In-First Out) management.
Examples: expiry-sensitive items like medicines or fresh produce, seasonal apparel, packaged snacks.
4. Demand Flexible Storage for varying sizes with Quick Retrieval for fast order fulfilment.
Examples: small to large appliances, building materials like cement bags or tools, automotive parts.
5. Are Medium – Heavy and require organised vertical storage for easy picking.
Examples: tires, batteries, medium-weight tools, storage containers.
6. Are Sensitive/ Time-Bound, needing efficient stock control.
Examples: vaccines, perishable goods, high-demand products.
7. Are Fragile yet Medium – Heavy in Weight.
Examples: glass bottles, delicate furniture, fragile containers.
8. Require a durable and Versatile Storage Solution.
Examples: machine parts, bricks, tiles, industrial supplies.